Monday, May 7, 2012

Migrate SharePoint 2010 My Sites from default Web Application

Recently I had a client that had setup their "My Sites" in the same web application as their default intranet and wanted to move them to a new web application.
I found several posts on how to exporting my sites like this one and migrating My Sites to a new Content Database but none that actually tacked the issue of moving to a new Web Application.
Well this turned out to be easier than I thought.

  1. Migrate the "My Sites" content to a new content database.
    $db = Get-SPContentDatabase WSS_Content
    Get-SPSite http://portal/personal/* -Limit ALL | where { $_.ContentDatabase -eq $db }
    Get-SPSite http://portal/personal/* -Limit ALL | where { $_.ContentDatabase -eq $db } | Move-SPSite -DestinationDatabase WSS_Content_My_Sites -Confirm:$false
    
  2. Remove this new content database from the current Web Application.
    In Central Admin -> Application Management -> Manage content databases. Select Content DB, in my case WSS_Content_My_Sites and select Remove content database


  3. Create a new Web Application to house the My Sites.
    Central Admin -> Application Management -> Managed web applications -> Select New from the ribbon.  There is no need to create a new site collection since we are going to drop the content database that will be created.
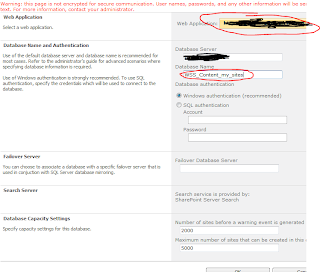
  4. Re-attach the content database previously removed to this new Web Application
    Central Admin -> Application Management -> Manage content databases.
    Make sure you select the correct Web Application and use the correct database name.
  5. Set the Self-Service Site Creation for the new My Site Web Application.
    Central Admin-> Application Manager -> Manage web application -> select site then Self-Service Site Creation in ribbon
  6. Update links in SharePoint to create new "My Sites" in this new location.
    Central Admin -> Application Management -> Manage service applications
    Select User Profile Service then Manage in the ribbon
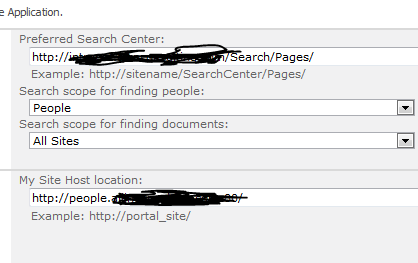
    Under My Site Settings -> Setup My Sites -> update My Site Host location
  7. Remove the content database that was created with the new "My Site" Web Application

Wednesday, January 11, 2012

How to get a SharePoint person field's email adress

This week I had the need to access the email address of a user that was in a person field of a SharePoint list.

Well I incorrectly assumed that this was some flavor of  a SPUser object, turns out the person field in a SPList is a special type SPFieldUser.

Well lets cut to the chase this is the code to access the email address of a SPListItem person column;


private bool EmailUser(SPListItem spListItem, string recordColumn, string subject, string message)
        {
            SPFieldUser spFieldUser = (SPFieldUser)spListItem.Fields[recordColumn];
            SPFieldUserValue spFieldUserValue = (SPFieldUserValue)spFieldUser.GetFieldValue(
                                                    spListItem[recordColumn].ToString());
            if (string.IsNullOrEmpty(spFieldUserValue.User.Email) == false)
                return SPUtility.SendEmail(spListItem.Web, false, false, spFieldUserValue.User.Email, subject, message);
            else
                LogWrite("Error", string.Format("Send Email Error Message")
                                                ,spFieldUserValue.User.Name));
            return false;
        }

Friday, October 28, 2011

How to change the view used by XsltListViewWebPart

So I was in a situation that I needed to change what view was being displayed on a page dynamically.
I am using the the XsltListViewWebPart to display all the values of a list to the user and depending on the user and different properties of the list items I needed to filter the view as well as assign a different XSL file.

The biggest problem I had was that the list view GUID  is created only at deploy time and I could find no other way to assign a different view.

I came across several posts that had examples of changing the view or adding a new XLVWP to the page at deploy time
http://sharepoint.stackexchange.com/questions/4843/reusing-the-xsltlistviewwebpart and http://social.technet.microsoft.com/Forums/zh/sharepoint2010programming/thread/983d2098-d742-4708-8bdc-437aa07b3b9d

So I wanted to take this a little further and be able to dictate what view was used on the fly.  Using a QueryString of the ListID and the ListViewName I then assign the appropriate view in the OnInit event as shown below.


public partial class RecordHistory : DialogLayoutsPageBase
{
     protected void Page_Load(object sender, EventArgs e)
     {
     }
     protected override void OnInit(EventArgs e)
     {
         base.OnInit(e);
         string[] strLists = Request.QueryString.GetValues("ListID");
         string[] strListViewName = Request.QueryString.GetValues("ListViewName");

         if (strLists == null || strLists.Length < 1)
         {
             throw new SPException(SPResource.GetString(Strings.MissingRequiredQueryString, "ListID"));
         }
         SPList spList = SPControl.GetContextWeb(Context).Lists.GetList(new Guid(strLists[0]), true);
         SPView view = spList.Views[strListViewName[0]];
         this.xlvwpRecordHistory.ViewGuid = view.ID.ToString();
         this.xlvwpRecordHistory.ViewId = int.Parse(view.BaseViewID);
         this.xlvwpRecordHistory.XmlDefinition = view.GetViewXml();
     }
}

As always there are many ways to do this that might be better but this worked and I found no other examples of this on the web.
Please let me know if you have a better idea

Monday, June 6, 2011

Basic steps for Moving a SharePoint site collection between domains

Before you start
Make sure SharePoint versions are the same on source and destination servers, service packs and patches.

Permissions
There are some basic permissions that need to be configured (if they have not already).
See Add-SPShellAdmin. If you are using Windows authentication to connect to SQL Server, the user account must also be a member the SQL Server dbcreator fixed server role on the SQL Server instance where the database will be created. If you are using SQL authentication to connect to SQL Server, the SQL authentication account that you specify when you create the content database must have dbcreator permission on the SQL Server instance where the database will be created.

Add-SPShellAdmin -UserName Domain\User Name

Migrate Data
Backup Site Collection on Farm A.
On the server farm that contains the original site collection open a SharePoint 2010 Management Shell.
In the power shell window type the following command:
Backup-SPSite –Identity http://FarmASiteCollection -Path TempPathAndFileName.bak -Force
Force will overwrite a previously backup file.

Create Content Database on Farm B.
Assuming the appropriate Web Application already exists then you just need to create a new content database.
On the server for farm B open a SharePoint 2010 Management Shell.
In the power shell window type the following command:
New-SPContentDatabase -Name ContentDbName -WebApplication WebApplicationName
 -
DatabaseServer DBServerName

Restoring Site Collection on Farm B.
In the power shell window type the following command:
Restore-SPSite –Identity FarmBSiteCollection -Path TempPathAndFileName.bak
-DatabaseServer DBServerName -DatabaseName ContentDbName

Restore Access/Permissions
You need to add a user via command line because the restored site will deny all of your login attempts (unless your server is on the same domain as the original source server).

Using the central administration console, you will note that the site collection still references the original administrators which are now invalid on this new domain.
NOTE: you can view using following steps >> Central Administration >> Application Management >> Site Collection Administrators (on Farm B SharePoint central administration domain).

·         Now you need to change ownership of the site collection using following command.
Set-SPSite –Identity FarmBSiteCollection -OwnerAlias “domain/User”
·         Now if you refresh central admin console you will see the new administrator as an owner, you can change the secondary administrator at this point as well using same utility.
Set-SPSite –Identity FarmBSiteCollection - SecondaryOwnerAlias “domain/User”
·         Now reset the IIS and you can login the main site collection as an administrator.
·         Then you can optionally run this to clean up the old lingering logins explicitly
Move-SPUser –Identity olddomain\UserName  - NewAlias newdomain\UserName

Wednesday, May 18, 2011

BitCoins???? Fascinating concept.

Came across this article not sure I understand all the concept but what an idea.
Is this really going to take off or just die a slow death like many cool concept?


Wednesday, March 16, 2011

Reader Quotas for WCF Services in SharePoint 2010

Creating a WCF service in SharePoint 2010 is relatively easy.  The first thing to do is follow the basic steps in Microsoft's post "Creating a Custom WCF Service in SharePoint Foundation".  This will give you a nice starting point for your Service as long as you don't need to need to change any of the Binding information.

Try sending a 70k file to your nice new WCF service.  Oops  error!

The remote server returned an unexpected response: (400) Bad Request.*
Or

The maximum string content length quota (8192) has been exceeded while reading XML data. This quota may be increased by changing the MaxStringContentLength property on the XmlDictionaryReaderQuotas object used when creating the XML reader.

Ok no problem.  If you have done any WCF Service code in the past you probably know that you need to alter some of the binding information to increase the message size and or change the attributes for the readerQuotas no big deal right? 

Wrong!!! 

SharePoint 2010 has this great new hosting ability MultipleBaseAddressBasicHttpBindingServiceHostFactory and it does all the work required to set up the end points and bindings. You don't need to do create a web.config file or write any WCF service code.

So right about now you should be asking yourself "Self, how do I change the binding information then?".
Well after hunting around for the better part of a day I found a couple of post that talked about using the SPWebService.ContentService to programmatic change the binding information.
For example:


But no where do any of the post talk about where do I run this code.  Wouldn't make sense to run it on the client, although you do need to make some changes on the client side as well.  And running it as a Event Receiver when the feature for the WCF Service is installed did not work for me ether.

So what next???
Well I finally came across a comment on one of the MSDN pages by Dan Mayernik.

First, to update the configuration for a custom WCF service -add a WebApplication level feature with nothing more then a feature receiver. The receiver should override "FeatureInstalled" as follows:


Obviously, the values listed above are the extreme cases and should be set according to what your service will need. Also, the key for the indexer used for the WcfServiceSettings collection is the name of your service file. If you place the file in a subdirectory -do not include the subdirectory name as part of the key.

Thus, if your service is deployed to the ISAPI directory under:
/MyCompany/MyCustomService.svc

the key for the WcfServiceSettings collection would be:
mycustomservice.svc
 

CAUTION: The key, as stated above, is case sensitive. The key should be all lowercase.


Thanks goes to Dan he saved me from loosing any more of my hair (this week)

Monday, July 12, 2010

Reusing file in Visual Studio without copying

This is so silly but I just figured out how to do it and I had to post it (in case someone else is as brain dead as I was).
When you want to add an existing file to your current project in Visual Studio that's located outside the current project's directory, that file is copied into the project folder, then it's added to the project.

Well what if you don't want a duplicate file?

Maybe you want to share the same source file in multiple projects so that if you modify the code in one project (to fix a bug, for example) the updated code is immediately available to the other projects.

I know, I know, most of us would create some sort of shared library for this code and just reference this DLL or even the whole VS project, but to add a shared file all you need to do is instead of clicking the 'Open' button when adding an existing file, click the arrow to the left of this button. Then select 'Link File' from drop down, this way you create a link to the original file without coping it locally.
Simple!